Onboarding multiple Arc-enabled servers with the help of map file
Posted on: October 9, 2023Onboarding Azure Arc-enabled servers is typically started from Azure Portal using this dialog:
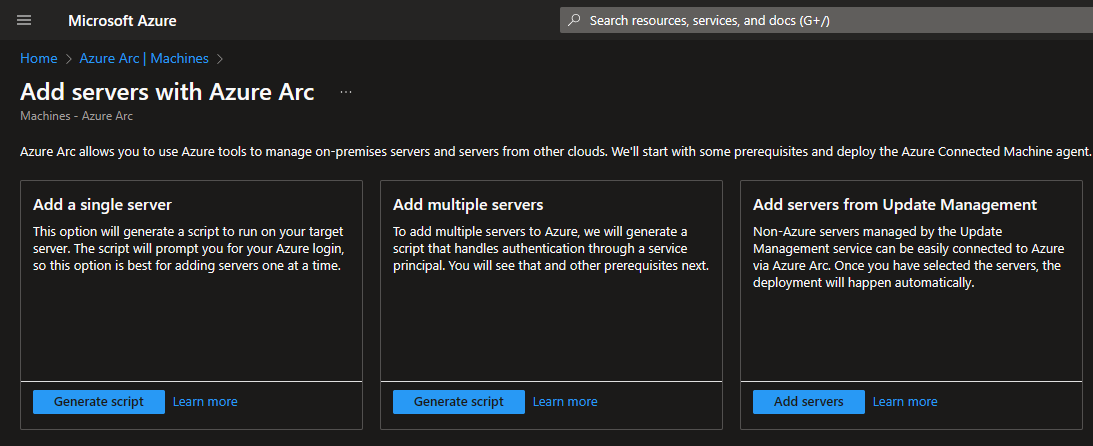
If you plan to deploy multiple servers, then you are most likely to select the middle option. Next you need to select deployment method. For Windows you have these options to select:
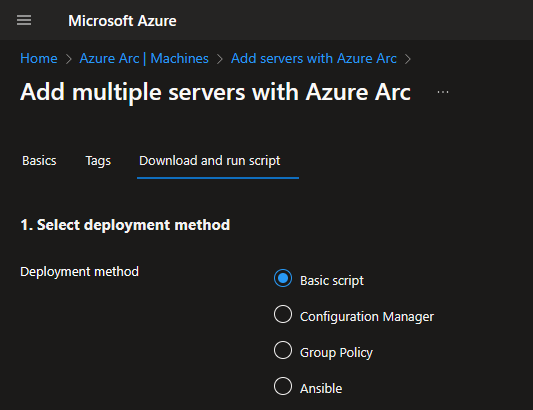
If you look at the underlying scripting technology underneath those deployment methods, you’ll find PowerShell there.
Basic script and Configuration Manager are easy to check since portal will ask
you to download PowerShell script right away.
For Group Policy, it will ask you to download scripts from this repository:
 Azure/ArcEnabledServersGroupPolicy
If you look at the code there, you’ll find PowerShell again.
For Ansible deployment, it’s still using following PowerShell snippet for the deployment:

It means that we have PowerShell capabilities that are at our fingertips if we want to customize the deployment a bit.
Now imagine the scenario that you would like to onboard tons of servers, but you would like to onboard them with different parameters. Examples can be from different Azure subscriptions and resource groups to different tags etc.
You could do multiple different script versions, but it quickly becomes hard to maintain and manage. Alternatively, we can introduce simple customization for our onboarding experience. This is what we want to achieve:
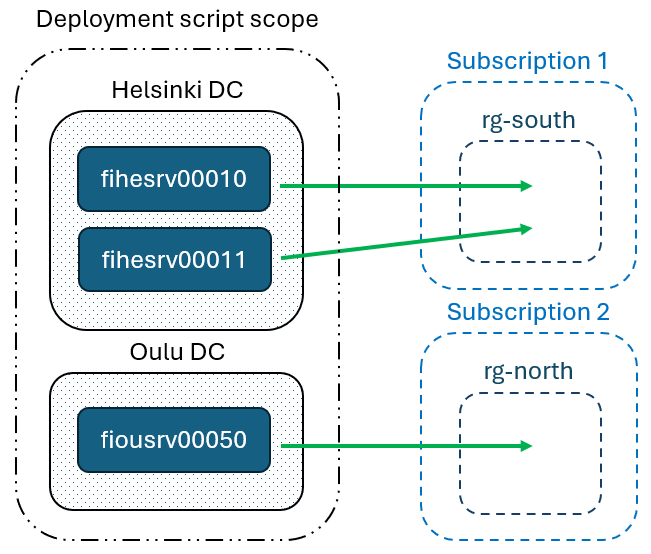
Conceptually, if we want to deploy multiple servers using single script, we will need to map these servers to their individual deployment parameters. I refer to this file as a mapping file. Mapping file should contain identifier for the server and then its matching parameters. If there isn’t mapping for certain servers, then they will use the deployment default values.
Excel is a good tool for managing and creating such mapping. It’s easy to pull the information from different sources and massage it to specific format in Excel. Many people know how to do this, and you don’t need developer skills to create it. Here is an example of a mapping file in Excel:

The above structure is quite simple. The first column has an identifier for the server.
In PowerShell terms it matches the $env:COMPUTERNAME.
Those three other columns are just examples of possible deployment parameters
that you may want to override.
You can of course have more columns if you need to.
To show that data in ; delimited CSV format, it looks like this:
Name;ResourceGroup;SubscriptionId;Tags
fihesrv00010;rg-south;3ca5f54c-9e15-45e3-9be8-e922be122c24;Datacenter=DC1,City=Helsinki
fihesrv00011;rg-south;3ca5f54c-9e15-45e3-9be8-e922be122c24;Datacenter=DC1,City=Helsinki
desktop-6J3L2U9;rg-south;3ca5f54c-9e15-45e3-9be8-e922be122c24;Datacenter=DC1,City=Helsinki
fiousrv00050;rg-north;938ba7df-b539-4b68-ba55-cf37c5048d32;Datacenter=DC1,City=Oulu
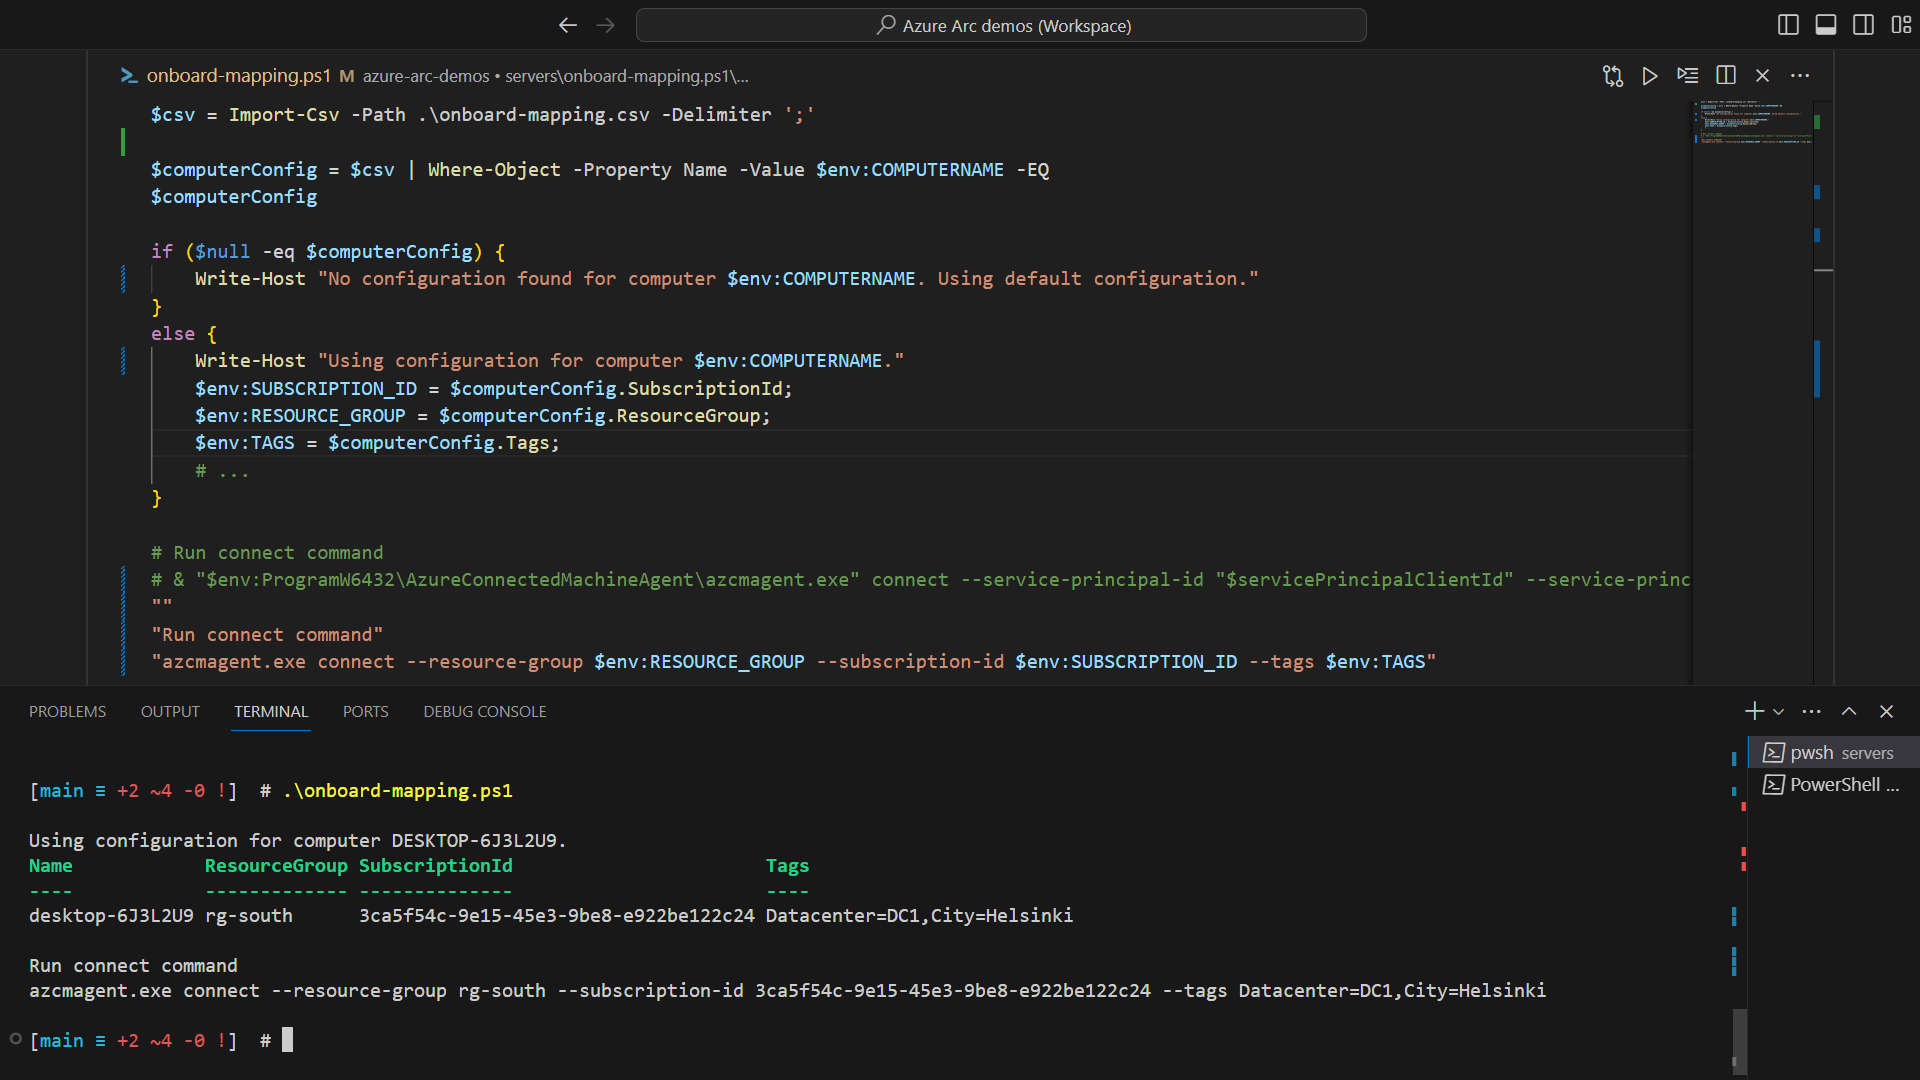
Here is an example PowerShell snippet to use that information:
$csv = Import-Csv -Path .\onboard-mapping.csv -Delimiter ";"

$computerConfig = $csv | Where-Object -Property Name -Value $env:COMPUTERNAME -EQ
$computerConfig

if ($null -eq $computerConfig) {
  Write-Host "No configuration found for computer $env:COMPUTERNAME. Using default configuration."
}
else {
  Write-Host "Using configuration for computer $env:COMPUTERNAME."
  $env:SUBSCRIPTION_ID = $computerConfig.SubscriptionId;
  $env:RESOURCE_GROUP = $computerConfig.ResourceGroup;
  $env:TAGS = $computerConfig.Tags;
  # ...
}
Here is an example output of that:
Now you’re ready to integrate these changes to the deployment script that you downloaded from the portal.
Here is an example Basic script deployment customization:
try {
    # Add the service principal application ID and secret here
    $servicePrincipalClientId="<ENTER ID HERE>";
    $servicePrincipalSecret="<ENTER SECRET HERE>";

    $env:SUBSCRIPTION_ID = "6eccf8a5-bc2d-448b-bf79-8d5df172c56a";
    $env:RESOURCE_GROUP = "rg-target";
    # ...

    ######################
    # NOTE: This part is new-->
    $csv = Import-Csv -Path .\onboard-mapping.csv -Delimiter ';'
    $computerConfig = $csv | Where-Object -Property Name -Value $env:COMPUTERNAME -EQ
    $computerConfig

    if ($null -eq $computerConfig) {
        Write-Host "No configuration found for computer $env:COMPUTERNAME. Using default configuration."
    }
    else {
        Write-Host "Using configuration for computer $env:COMPUTERNAME."
        $env:SUBSCRIPTION_ID = $computerConfig.SubscriptionId;
        $env:RESOURCE_GROUP = $computerConfig.ResourceGroup;
        $env:TAGS = $computerConfig.Tags;
        # ...
    }
    # <--This part is new
    ######################

    # Run connect command
    # NOTE: Add additional deployment parameters to the command->
    & "$env:ProgramW6432\AzureConnectedMachineAgent\azcmagent.exe" connect --service-principal-id `
      "$servicePrincipalClientId" --service-principal-secret "$servicePrincipalSecret" `
      --resource-group "$env:RESOURCE_GROUP" --tenant-id "$env:TENANT_ID" `
      --location "$env:LOCATION" --subscription-id "$env:SUBSCRIPTION_ID" `
      --cloud "$env:CLOUD" --tags "$env:TAGS" --correlation-id "$env:CORRELATION_ID";
# ...
Note: You need to update .\onboard-mapping.csv to match your mapping file location.
That mapping file must be accessible by the servers.
Typically, this would be network fileshare.
Alternatively, you could embed that mapping data directly to the PowerShell file.
I have previously written about this mapping file approach here:
I hope you find this useful!