Application Gateway and App Service authentication
Posted on: April 8, 2024I wrote about Application Gateway and dynamic custom rules in Web Application Firewall in my previous post. In this post, I’ll continue to build on top of those learnings and connect dots with App Service authentication from which I also wrote recently App Service and OpenID Connect with Salesforce.
This time I have the following scenario:
- Two public facing web applications hosted in App Service
- The first application
AnonymousAppallows anonymous access - The second application
AdminAppis protected by App Service authentication- Entra ID as the identity provider
- This should be reachable only at
/adminand any other traffic should go to the first application:
- The first application
AdminAppcould be limited to private network only, but it was decided to be directly accessible from internet with seperate path and authentication- Application Gateway is in the front of the App Service
- Managed rule sets are enabled in the Web Application Firewall
- Capabilities of Application gateway are used extensively e.g., redirects HTTP to HTTPS:
- Extra bonus: DNS is handled by separate team, so we have to ask them to do the changes for us pre- and post-deployment
Here is the authentication flow for the above scenarios:
Click diagram to view in fullscreen
https://adminapp/admin AdminApp->>AppGw: EasyAuth redirects to Entra ID Note left of AdminApp: redirect_uri:
https://host/admin/signin-oidc AppGw->>User: Redirect to Entra ID User->>Entra ID: https://login.microsoftonline.com/... Note right of Entra ID: Login Entra ID->>User: Redirect to
https://host/admin/signin-oidc User->>AppGw: https://host/admin/signin-oidc AppGw->>AdminApp: Proxy request
https://adminapp/admin/signin-oidc Note left of AdminApp: EasyAuth processes authentication AdminApp->>AppGw: Return content AppGw->>User: Return content
Deployment
In order to deploy our applications successfully behind the reverse proxy scenario, there are a few things we need to understand:
Preserve the original HTTP host name between a reverse proxy and its back-end web application
Configure App Service with Application Gateway
App Service and Authentication and authorization
Map an existing custom DNS name to Azure App Service
Configure ASP.NET Core to work with proxy servers and load balancers
Application Gateway and Modifications to the request
From the above good reading list, we’ve learned the following things:
- We need to make sure that our application works behind reverse proxy
- We need to preserve the original host name in the request to the App Service
- In practice this means that our App Service should be configured with the same custom domain name as the Application Gateway
- Or then your application should support scenario when it’s behind reverse proxy
- Application should work with
X-Forwarded-*and/orX-Original-Hostheaders
- Application should work with
- Our application should work when accessed using
/adminpath
- We need to preserve the original host name in the request to the App Service
- Application Gateway adds
X-Original-Hostheader to the backend request, but it does not insertX-Forwarded-Hostheader- App Service authentication uses
X-Forwarded-Hostheader to determine the redirect URL - We need to create a rewrite rule in the Application Gateway to insert
X-Forwarded-Hostheader to the backend requests or configure the App Service authentication to useX-Original-Hostheader
- App Service authentication uses
Here are the high-level steps for our deployment:
- Create Entra ID App Registration
- This will be used in the App Service authentication
- Create pre-deployment DNS records
- CNAME record for the domain pointing to the App Service
- TXT record for domain verification done by the App Service
- Create certificate for App Gateway
- Deploy Azure infrastructure assets
- Create post-deployment DNS record
- A record for the domain pointing to the public IP of the Application Gateway
- Test the setup
Let’s go through these steps next in more detail.
1. Create Entra ID App Registration
I’ve written about Entra ID Group automation with PowerShell which basically shows how I approach the Entra ID automation.
I’ll use the same approach here to create the App Registration for the Entra ID:
# Public fully qualified custom domain name
$domain = "myapp.jannemattila.com"

# Create Entra ID app used in authentication
$appPath = "/admin" # In this demo "admin" is the "secured" application
$json = @"
{
  "displayName": "$domain",
  "signInAudience": "AzureADMyOrg",
  "requiredResourceAccess": [
    {
      "resourceAppId": "00000003-0000-0000-c000-000000000000",
      "resourceAccess": [
        {
          "id": "e1fe6dd8-ba31-4d61-89e7-88639da4683d",
          "type": "Scope"
        }
      ]
    },
  ],
  "web": {
    "implicitGrantSettings": {
      "enableIdTokenIssuance": true
    },
    "redirectUris": [
      "https://$domain$appPath/.auth/login/aad/callback"
    ]
  }
}
"@

$json

$applicationResponse = Invoke-AzRestMethod -Uri "https://graph.microsoft.com/v1.0/applications" -Method POST -Payload $json
$application = $applicationResponse.Content | ConvertFrom-Json
$application.appId

$secretResponse = Invoke-AzRestMethod -Uri "https://graph.microsoft.com/v1.0/applications/$($application.id)/addPassword" -Method POST
$secret = $secretResponse.Content | ConvertFrom-Json

$clientId = $application.appId
$clientSecretPlainText = $secret.secretText

$clientSecret = ConvertTo-SecureString -String $clientSecretPlainText -Force -AsPlainText
After executing the above script, you should have the clientId and clientSecret variables saved for yourself
and following application deployed to the Entra ID:
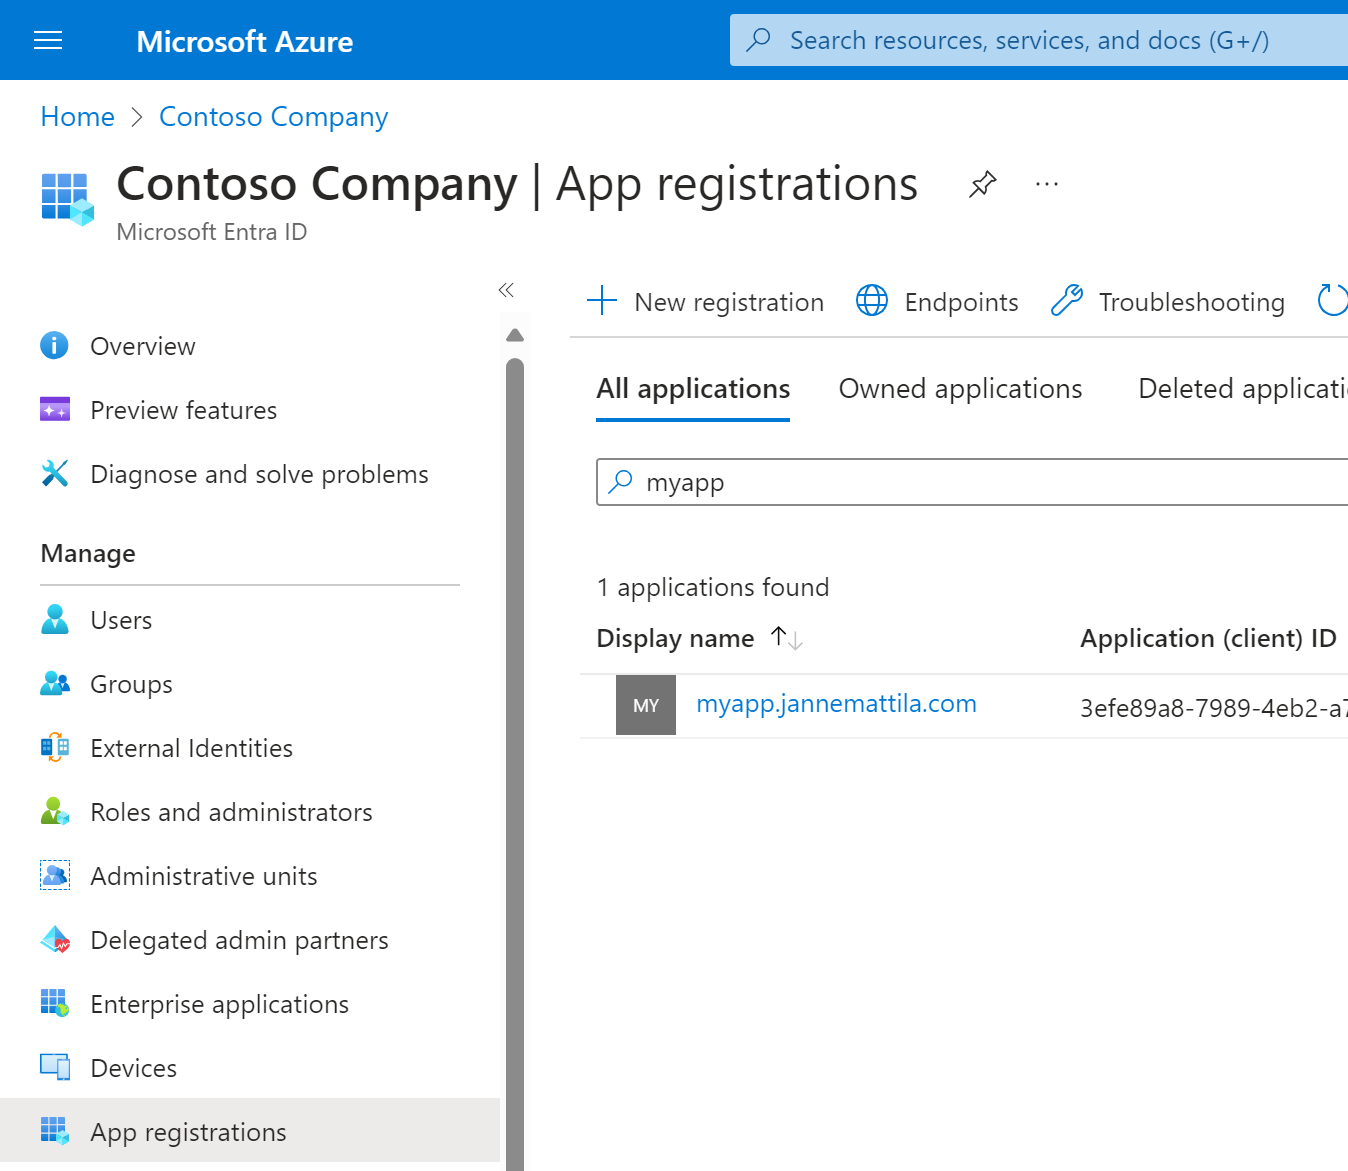
We’re going to use these values in our deployment later.
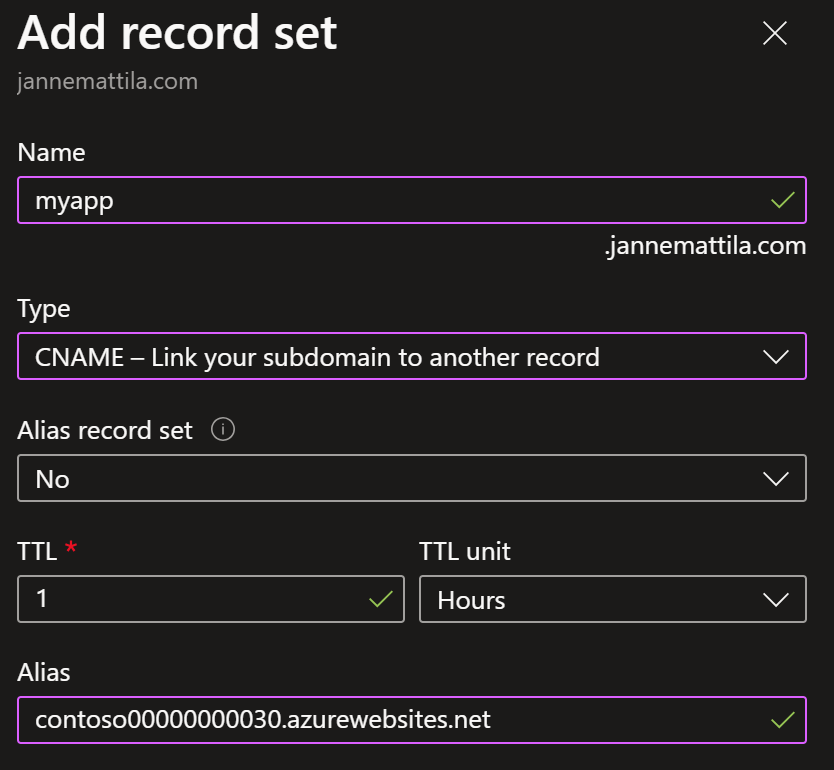
2. Create pre-deployment DNS records
In our setup we have to now create the following DNS records:
- CNAME record for the domain pointing to the App Service
- TXT record for domain verification done by the App Service
We cannot yet create A record because we don’t have the public IP of the Application Gateway available. That needs to be post deployment step.
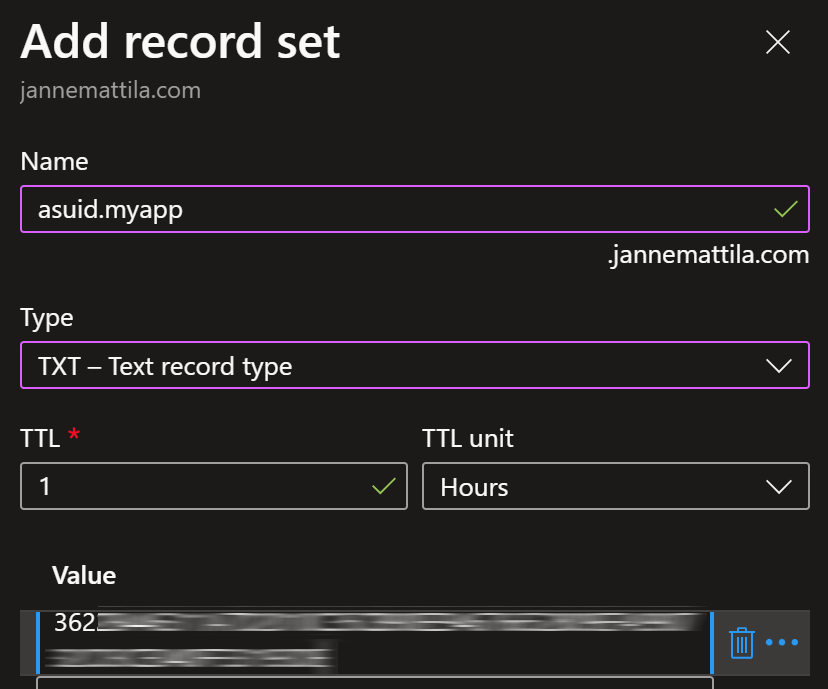
CNAME record we can create pre-deployment, because we set the domain name of the App Service in our deployment. App Service domain verification is something that we cannot set ourselves, but we can get the verification id using following script:
# Get custom domain verification id
$params = @{
  ResourceProviderName = "Microsoft.App"
  ResourceType = "getCustomDomainVerificationId"
  ApiVersion = "2023-08-01-preview"
  Method = "POST"
}
$customDomainVerificationId = (Invoke-AzRestMethod @params).Content | ConvertFrom-Json
# Note: This is unique _per_ subscription!
$customDomainVerificationId

# Create TXT record "asuid.myapp" to your DNS zone -> $customDomainVerificationId
# Create CNAME record in your DNS zone -> $domain -> <yourappservice>.azurewebsites.net
# After deployment, create A record in your DNS zone -> $domain -> <public IP of AppGw>
Important note: Custom domain verification id is unique per subscription.
Now we’re ready to create the CNAME record for the domain pointing to the App Service:
Similarly, we can create the TXT record for the domain verification identifier we got from the previous script:
Next, we can create certificate for the App Gateway.
3. Create certificate for App Gateway
In this demo, I’m going to use a self-signed certificate for the App Gateway but in real world scenario you would use a certificate from a trusted certificate authority.
Here is the script to create the self-signed certificate for our domain (run script as administrator):
# Public fully qualified custom domain name
$domain = "myapp.jannemattila.com"

# Certificate password
$certificatePasswordPlainText = "<your certificate password>"
$certificatePassword = ConvertTo-SecureString -String $certificatePasswordPlainText -Force -AsPlainText

$cert = New-SelfSignedCertificate -certstorelocation cert:\localmachine\my -dnsname $domain

Export-PfxCertificate -Cert $cert -FilePath cert.pfx -Password $certificatePassword
After executing the above script, you should have the cert.pfx file available for yourself.
We’ll place it next to our deployment files.
Now we’re ready to deploy the Azure infrastructure assets.
4. Deploy Azure infrastructure assets
In our previous steps we’ve created assets that we now need to pass to our deployment script:
$result = .\deploy.ps1 `
  -CertificatePassword $certificatePassword `
  -ClientId $clientId `
  -ClientSecret $clientSecret `
  -CustomDomain $domain

# Add this to A record into your DNS zone
$result.Outputs.ip.value
After the deployment script has finished, we have the public IP of the Application Gateway available. We’re going to use it in next step.
Our deployment is using App Service managed certificate which requires a bit more complex Bicep code. There is good background for this topic in the Bicep repository discussions:
 Azure/bicep/discussions/5006
In our scenario, we’ve on purpose different implementations for reverse proxy handling for our two web apps:
AnonymousAppis handing information from HTTP headers and has C# code implemented to handle reverse proxy scenario- You can use this approach if you can change the code
AdminAppis running in app service which uses same custom domain- This is a recommended option but also only option if you cannot change the code of the application
This approach is also recommended in the Application Gateway backend pool settings:
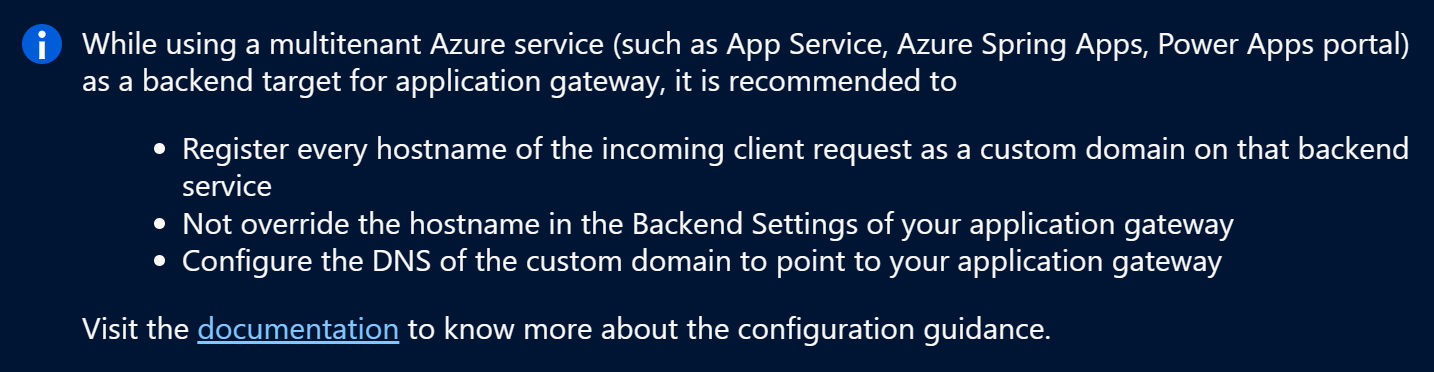
Here is the link to the documentation. Here is also step-by-step article how to Configure App Service with Application Gateway.
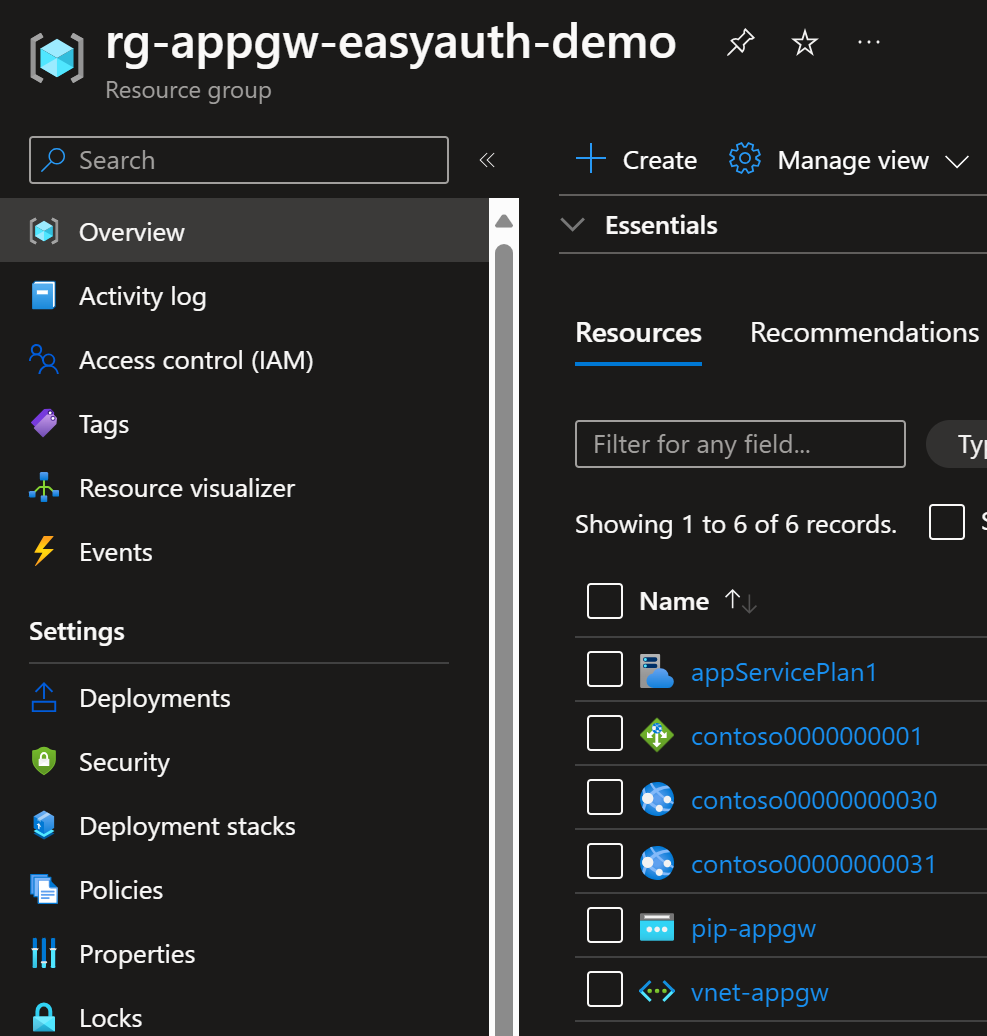
Here are the deployed resources:
5. Create post-deployment DNS record
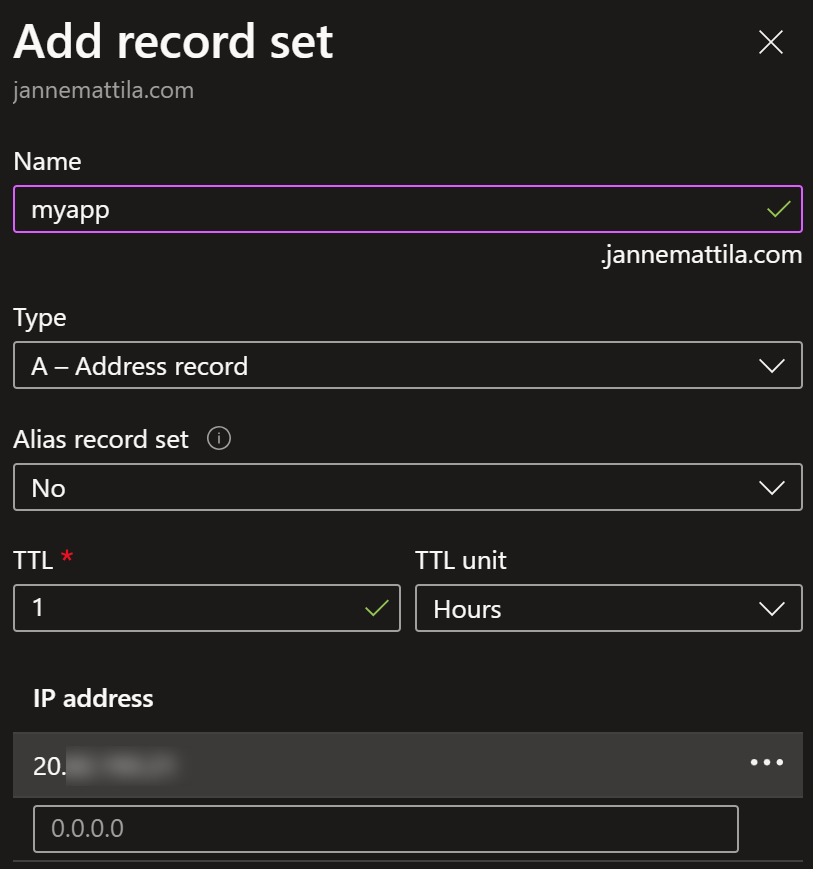
Before we can add A record to our DNS Zone, we have to remove the previous CNAME record. After that we’re ready to create the A record with the public IP of the Application Gateway:
Now we’re ready to test the setup.
6. Test the setup
First, we need to test HTTP to HTTPS redirection in Application Gateway:
# Will redirect to HTTPS
curl "http://$domain" --verbose
curl "http://$domain/admin/" --verbose
Both should redirect the traffic to HTTPS.
If you have been testing with CNAMEd domain, you might need to flush the DNS resolver cache before A record gets updated to your machine:
ipconfig /flushdns
Second, we need to test the anonymous access:
# Will return anonymous page content
curl "https://$domain" --verbose --insecure
curl "https://$domain/any/path/here" --verbose --insecure
We’re using --insecure in the above commands because we’re using self-signed certificate.
If you open the URL in the browser, you’ll see the certificate error:
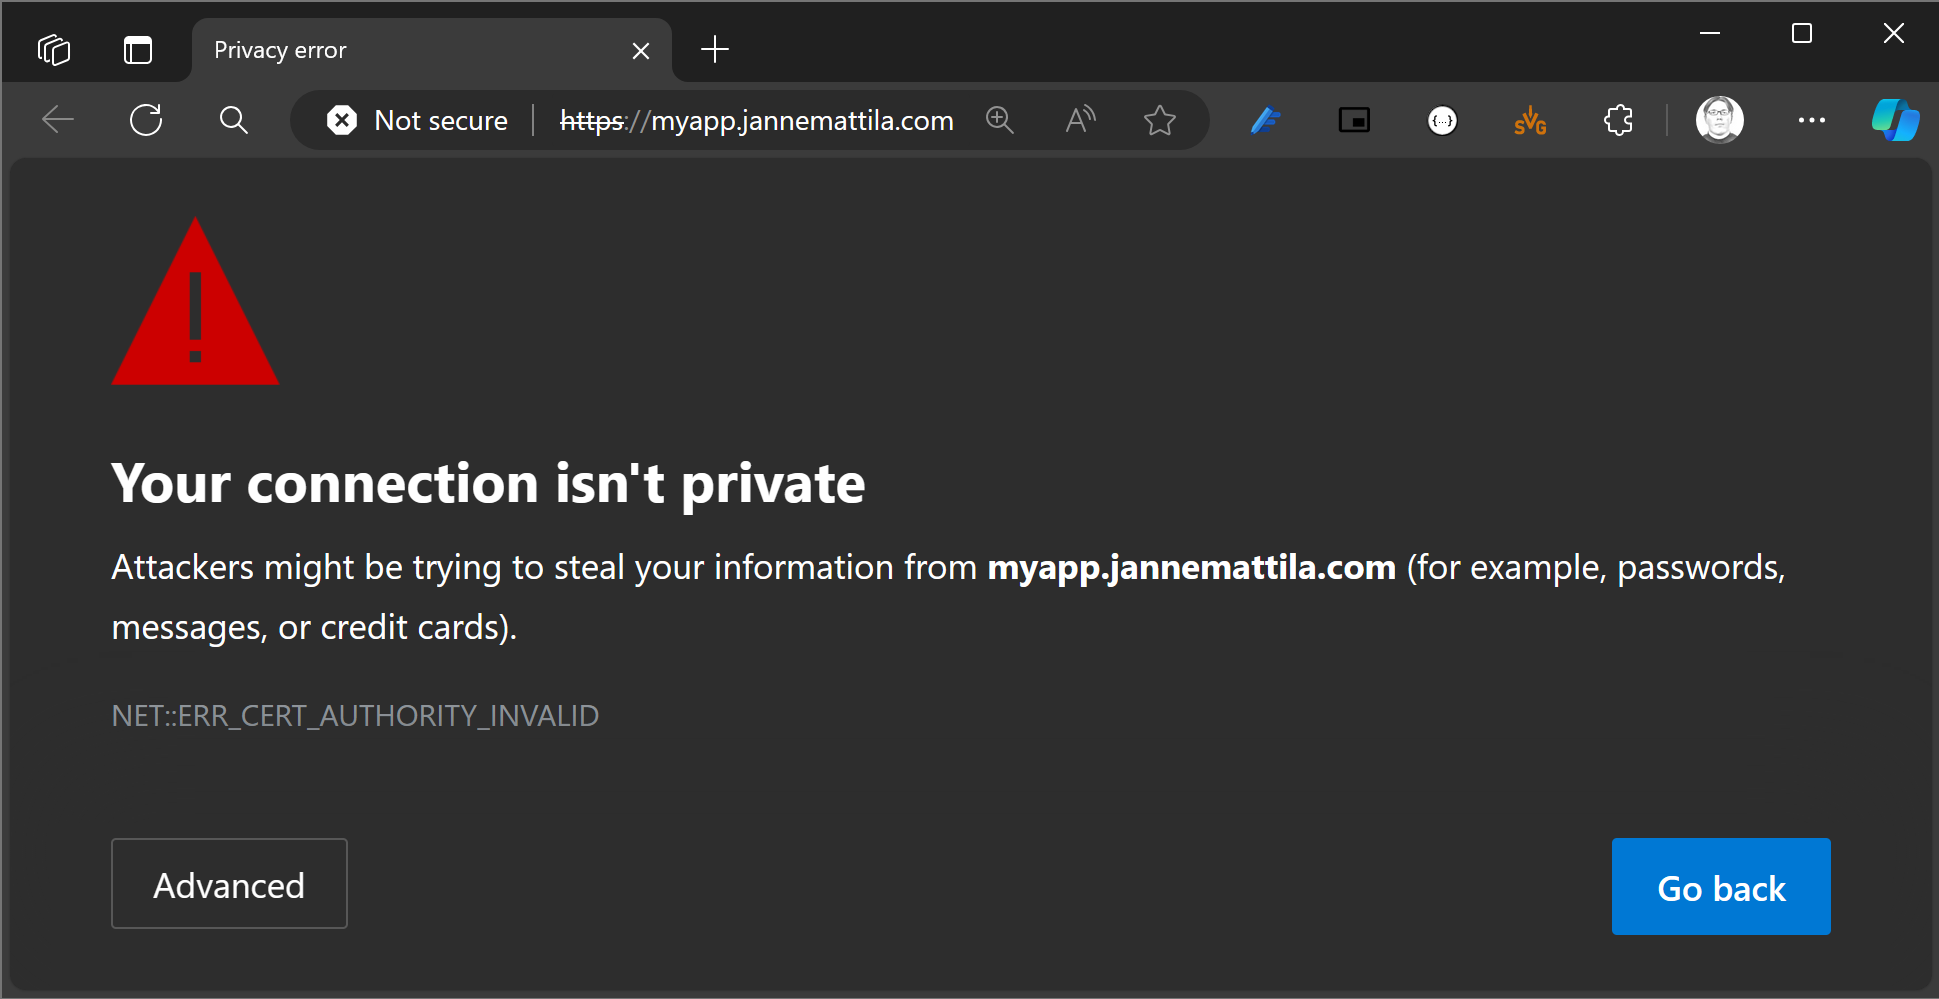
You have to use Advanced > Continue to the website to proceed.
And lastly, we start to test the App Service authentication:
# Forces authentication
curl "https://$domain/admin" --verbose --insecure
You should get 401 Unauthorized with redirect to the Entra ID login.
When you try to run the login process in your browser, you might end up with this error page, so our setup is not yet fully working as expected:
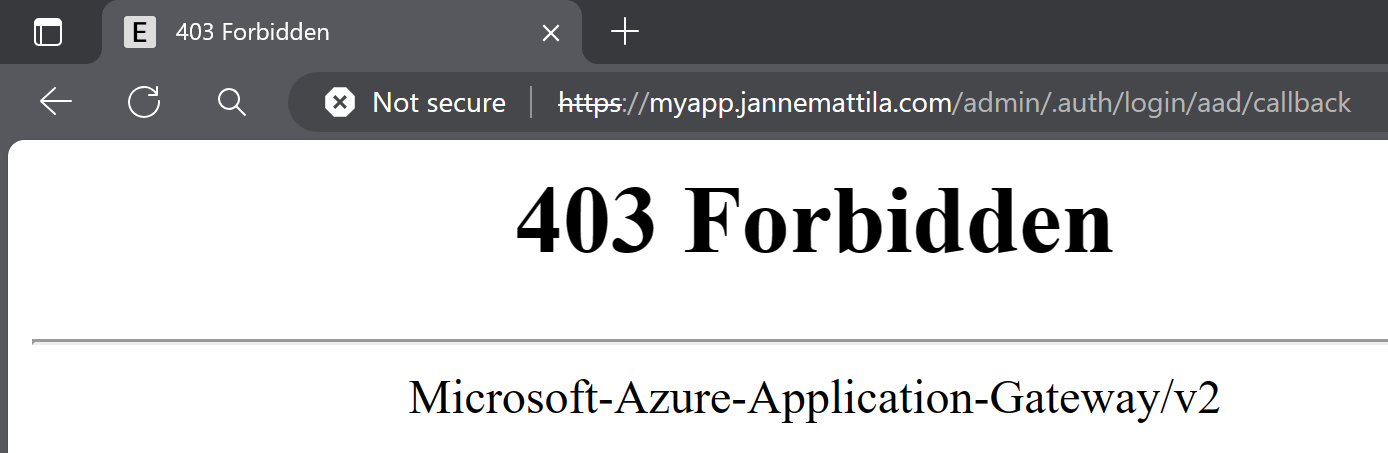
But if you try to use browser developer tools and analyze the flow, everything looks good from that perspective.
Let’s analyze our Application Gateway firewall logs:
AGWFirewallLogs
| where Action == "Blocked"
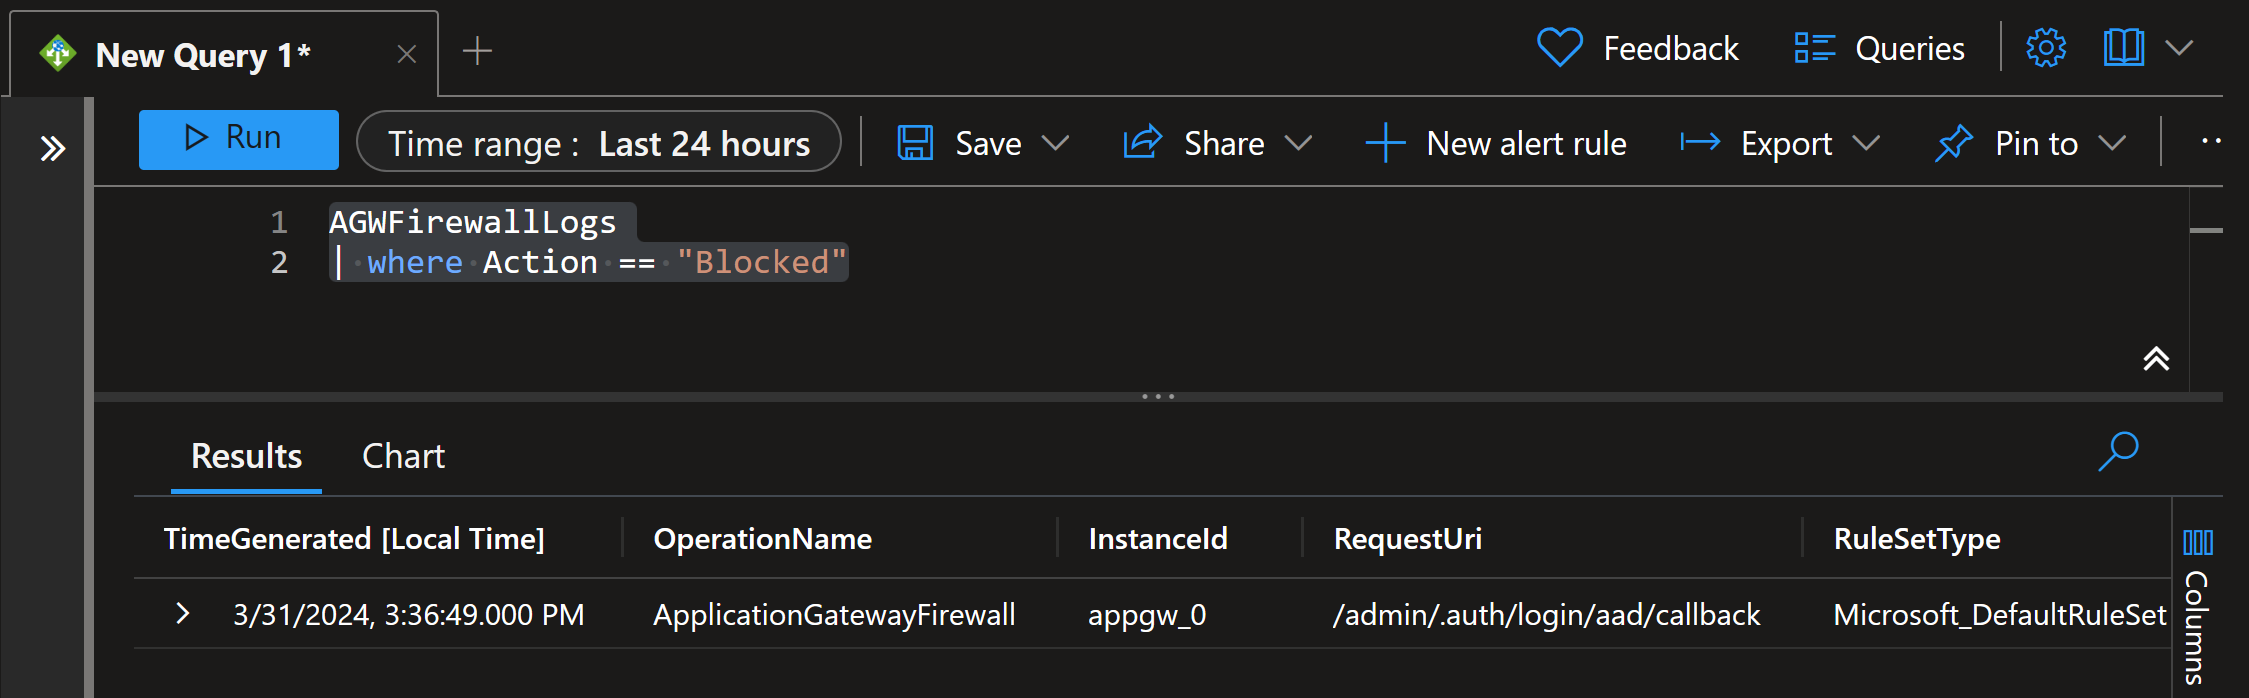
There is a single Blocked request in the logs. Let’s analyze it further:
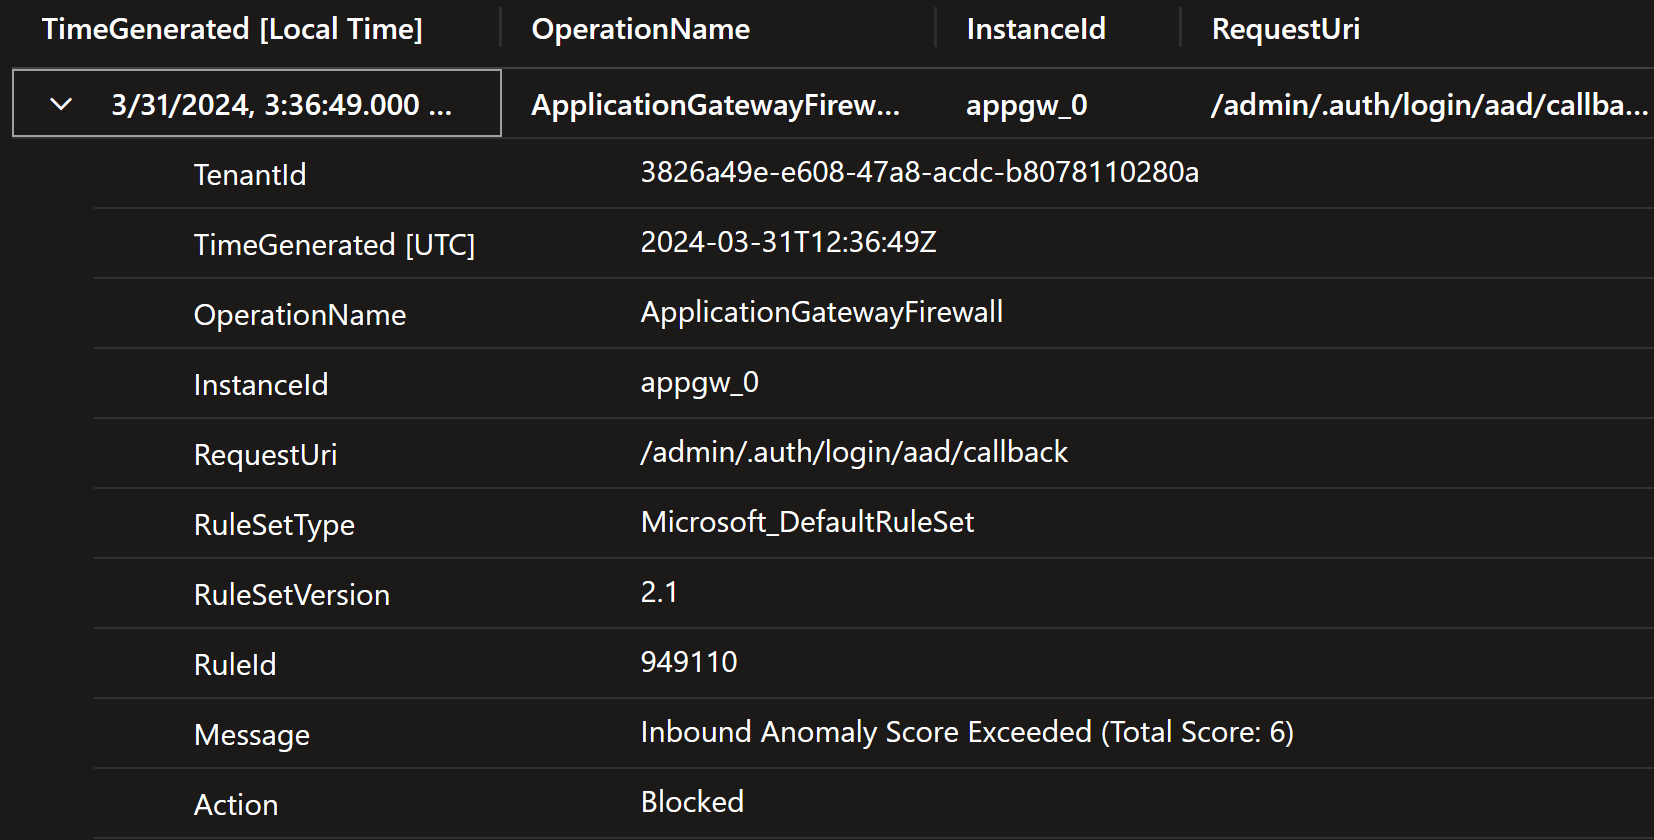
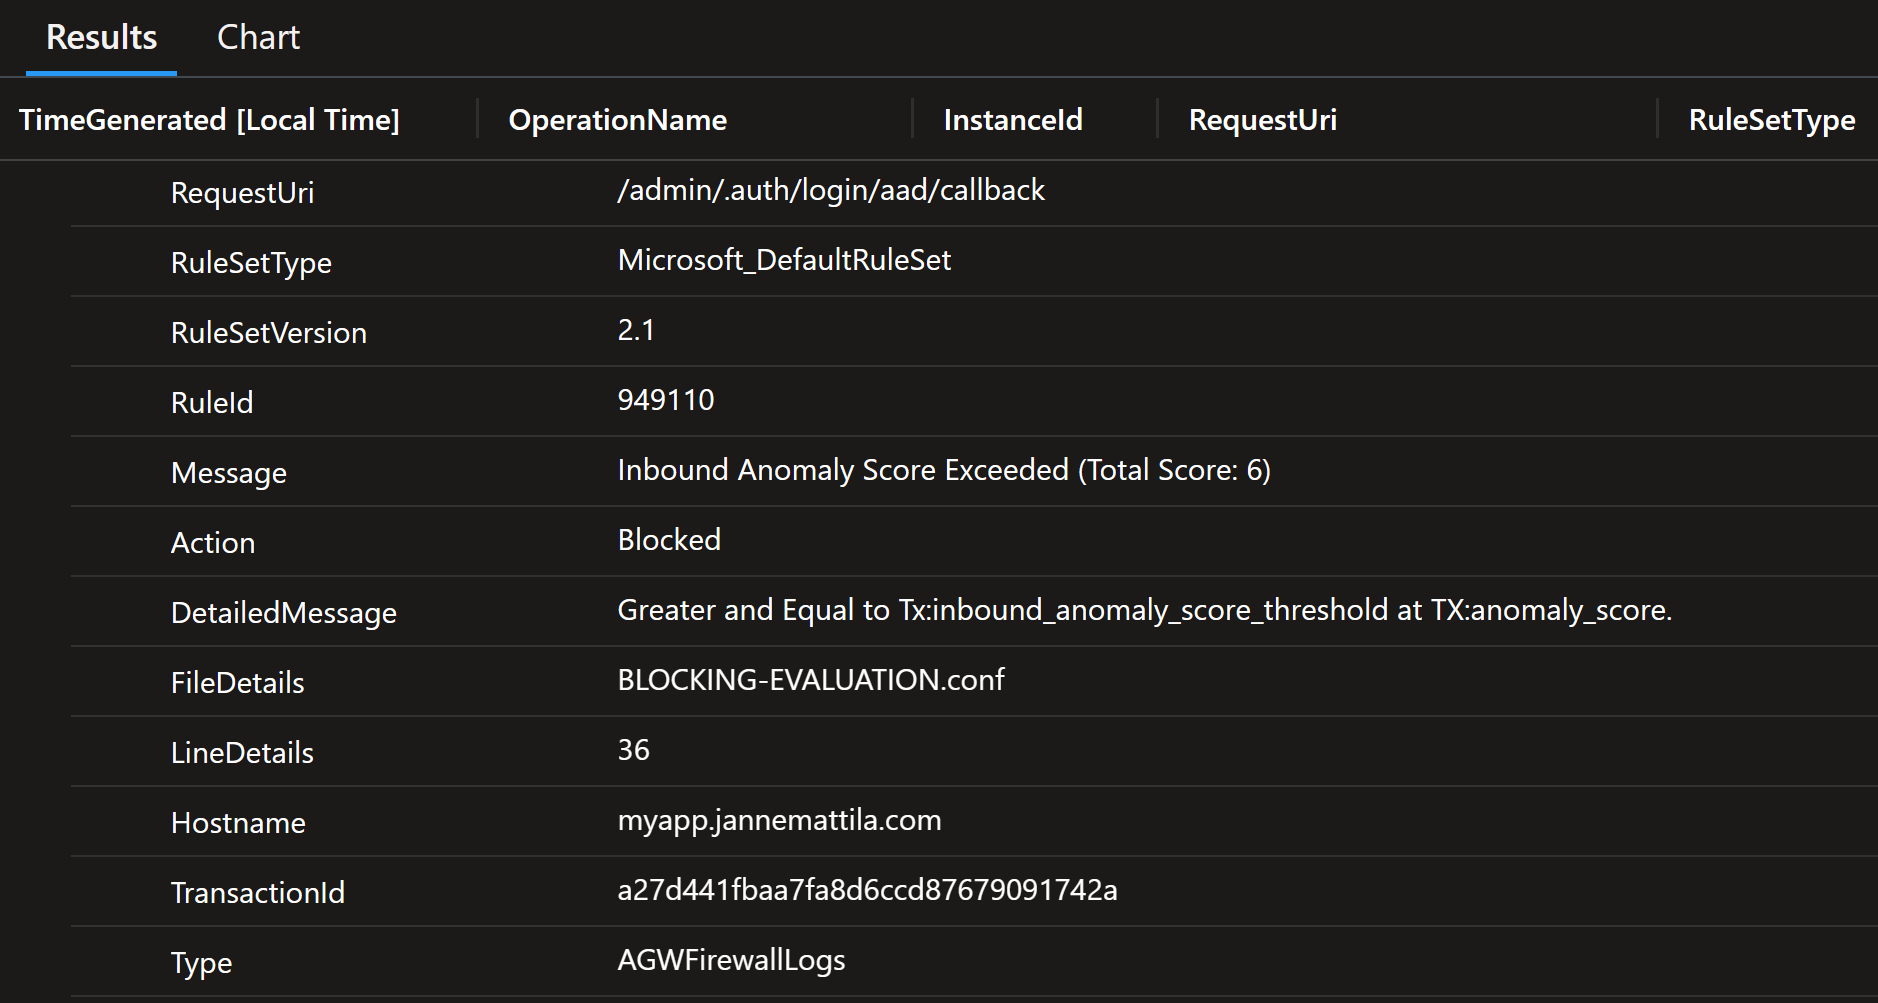
We can quickly see that our Web Application Firewall is blocking the request. See more details about managed rulesets.
The rule 949110 is actually special rule since it blocks if the
anomaly scoring
is too high.
If you look carefully the above logs, then you notice following text there:
Inbound Anomaly Score Exceeded (Total Score: 6)
We need to analyze the logs to see what is causing the high anomaly score.
Let’s continue our digging by executing the following query:
AGWFirewallLogs
| where RequestUri == "/admin/.auth/login/aad/callback"
Now we have three records instead of one:
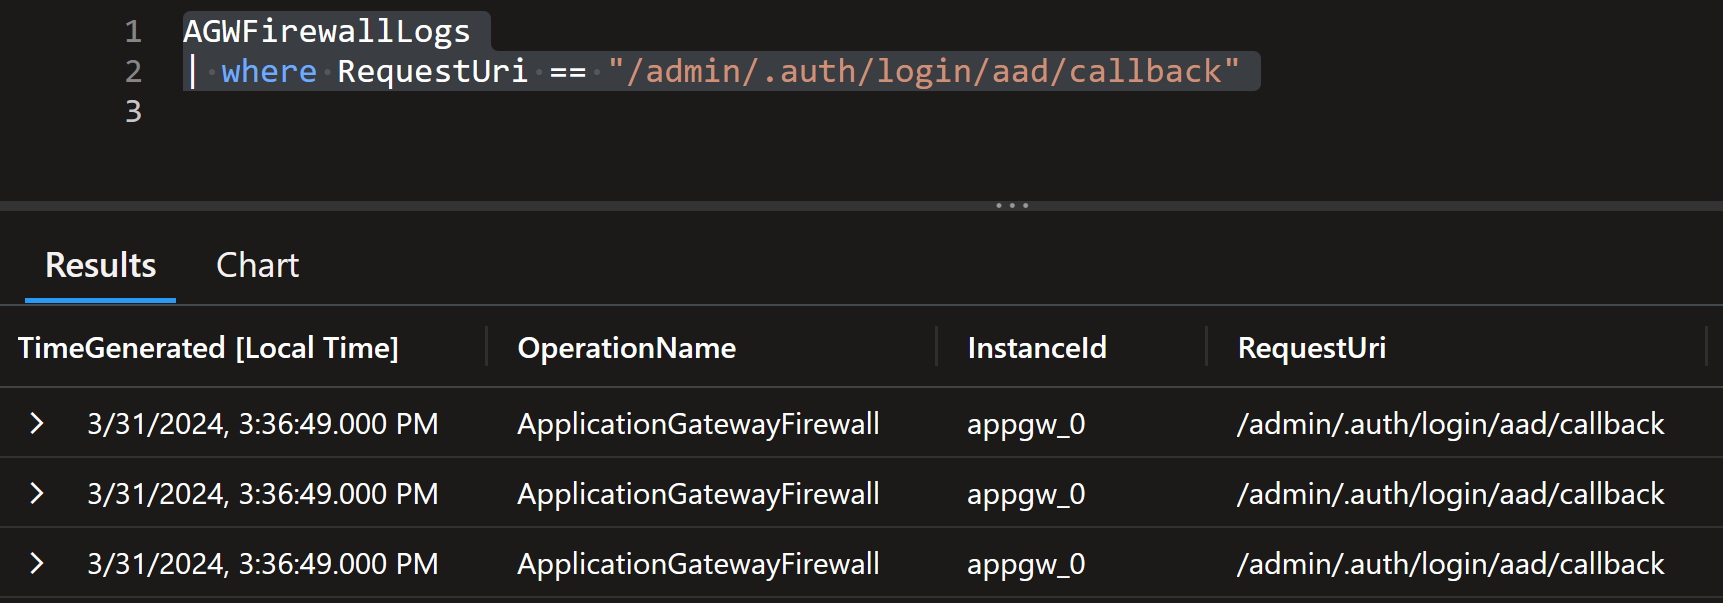
Looking at the details shows that there are two other rules that are causing the high anomaly score:

So, the interesting rules are actually:
- 920230 - Multiple URL Encoding Detected
- 942430 - Restricted SQL Character Anomaly Detection (args): # of special characters exceeded (12)
We have to now fix these false positives.
In this implementation, we’re going to create exclusions for rules:
920230942430
but only for URL /admin/.auth/login/aad/callback:
exclusions: [
  {
    matchVariable: 'RequestArgKeys'
    selector: '/admin/.auth/login/aad/callback'
    selectorMatchOperator: 'EndsWith'
    exclusionManagedRuleSets: [
      {
        ruleSetType: 'Microsoft_DefaultRuleSet'
        ruleSetVersion: '2.1'

        ruleGroups: [
          {
            ruleGroupName: 'PROTOCOL-ENFORCEMENT'
            rules: [
              {
                ruleId: '920230'
              }
            ]
          }
          {
            ruleGroupName: 'SQLI'
            rules: [
              {
                ruleId: '942440'
              }
            ]
          }
        ]
      }
    ]
  }
]
}
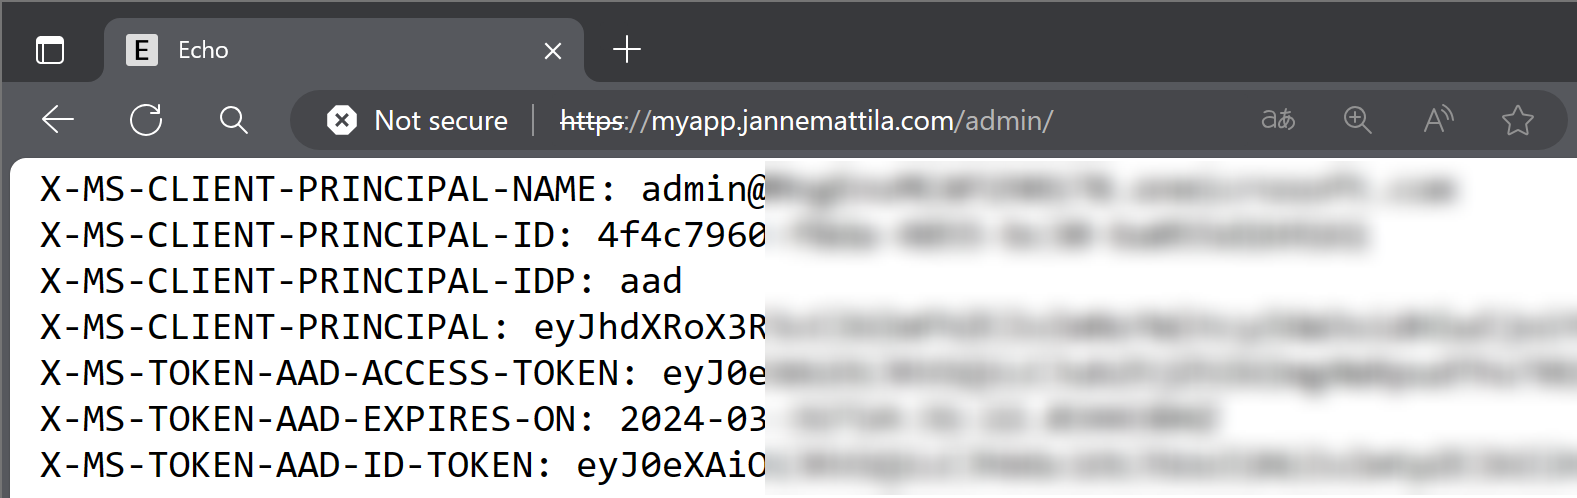
When that is done, we can test the setup again, and you should see EasyAuth headers available for your application:
Troubleshooting tips
In your implementation, you might stumble into some issues. Here are a few tips to help you to troubleshoot:
App Service authentication issues
If you’re having issues with App Service authentication, you might want to start by analyzing with browser developer tools
and pay special attention to the redirect_uri:
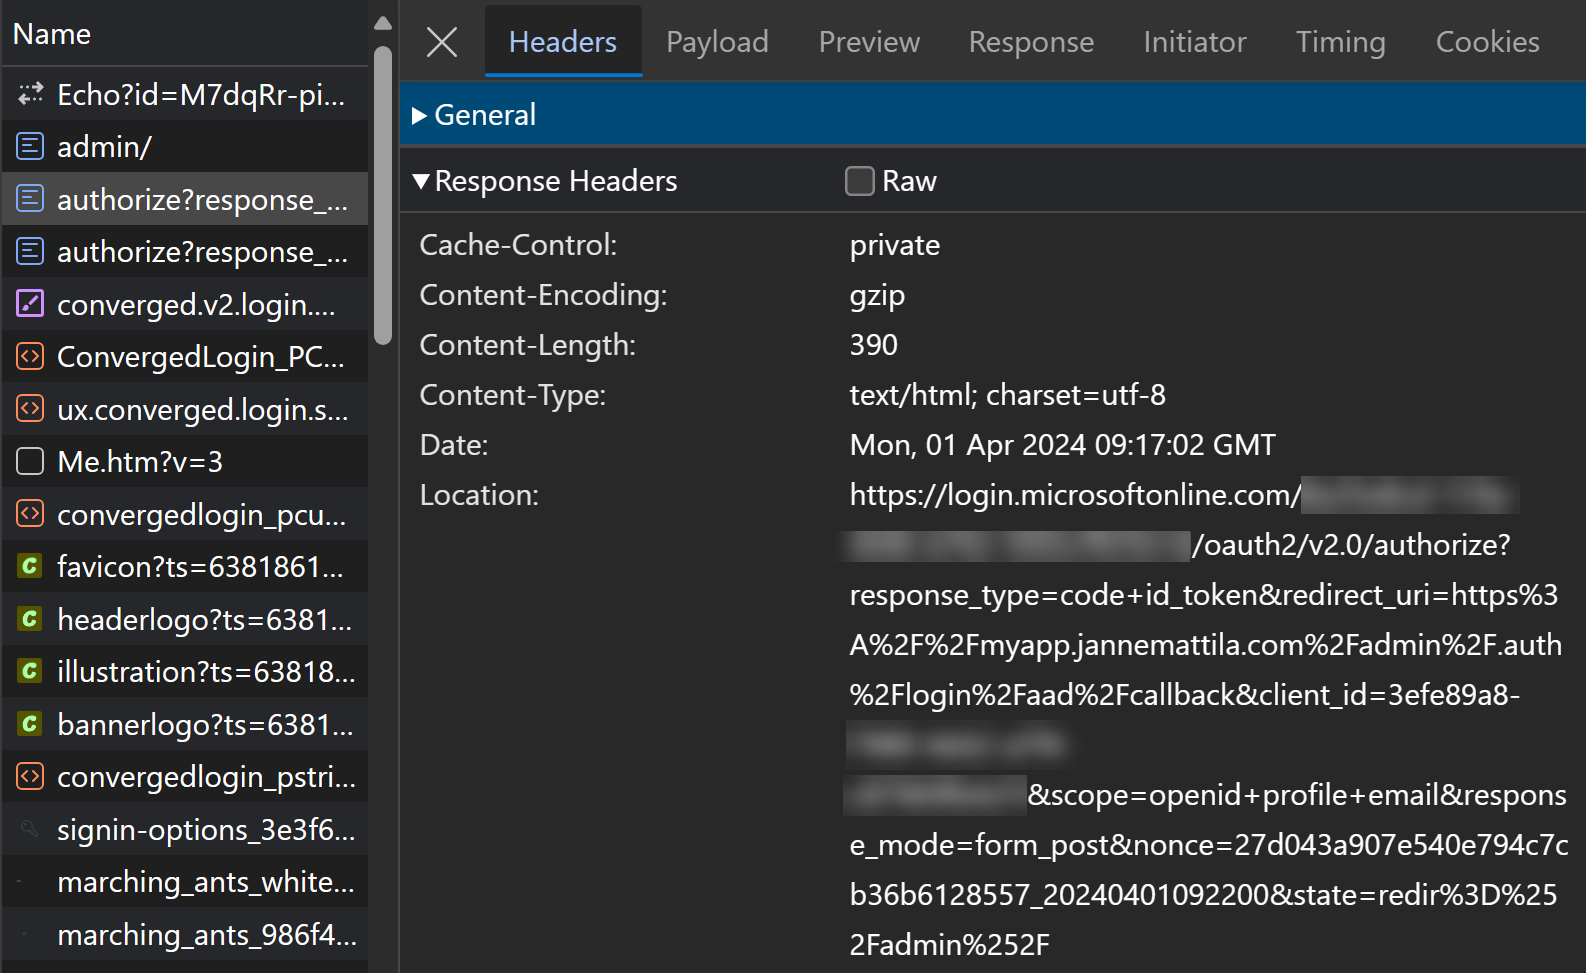
It should have path /admin/.auth/login/aad/callback:
https://login.microsoftonline.com
  /<tenantid>/oauth2/v2.0/authorize
    ?response_type=code+id_token
    &redirect_uri=https%3A%2F%2Fmyapp.jannemattila.com%2Fadmin%2F.auth%2Flogin%2Faad%2Fcallback
    &client_id=<clientid>
    &scope=openid+profile+email
    &response_mode=form_post
    &nonce=27d043a907e540e794c7cb36b6128557_20240401092200
    &state=redir%3D%252Fadmin%252F
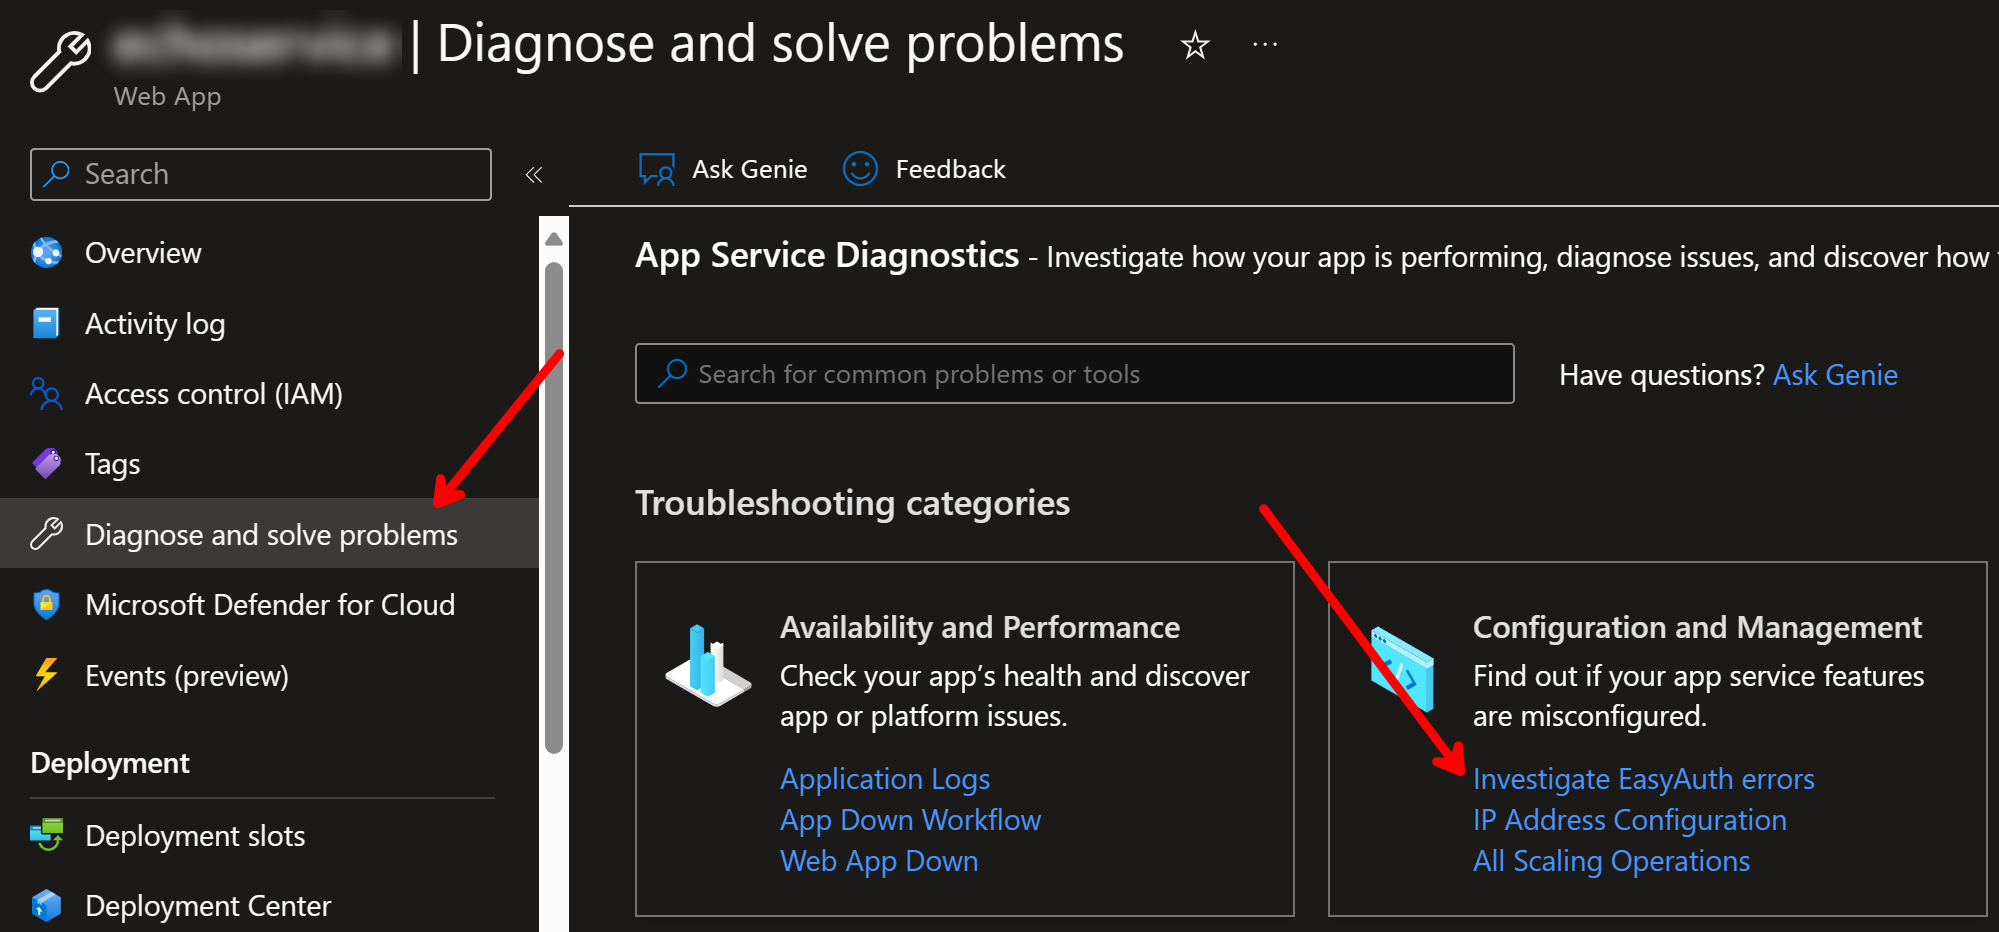
If it fails to some other issues after the redirect from Entra ID to your app, then check app service Diagnose and solve problems and then Investigate EasyAuth errors:
Reverse proxy issues:
You try to handle reverse proxy scenario in your application the code, but it still leaks the original host name out:
Check your application code and make sure that you understand which headers it is using. If you’re using ASP.NET Core, then you might want to check the following documentation:
Configure ASP.NET Core to work with proxy servers and load balancers
From that documentation you can see that it’s relying on X-Forwarded-Host header.
However, that header is not inserted by the Application Gateway by default.
You can either change your code to use X-Original-Host header or you can create a rewrite rule in the Application Gateway.
Here is how you can change your ASP.NET Core application to use X-Original-Host header:
// Abbreviated code
var options = new ForwardedHeadersOptions
{
  ForwardedHeaders =
    ForwardedHeaders.XForwardedHost |
    ForwardedHeaders.XForwardedFor |
    ForwardedHeaders.XForwardedProto
};

options.ForwardedHostHeaderName = "X-Original-Host";

app.UseForwardedHeaders(options);
If you want to use X-Forwarded-Host header, then you can create a rewrite rule in the Application Gateway:
rewriteRuleSets: [
  {
    name: 'rewriteRule1'
    properties: {
      rewriteRules: [
        {
          ruleSequence: 100
          name: 'add-forwarded-host-header'
          actionSet: {
            requestHeaderConfigurations: [
              {
                headerName: 'X-Forwarded-Host'
                headerValue: '{var_host}'
              }
            ]
          }
        }
      ]
    }
  }
]
After you’ve added the rewrite rule, you should see the X-Forwarded-Host header in your application:
X-Forwarded-Host: myapp.jannemattila.com
X-ORIGINAL-HOST: myapp.jannemattila.com
Important note: ASP.NET eats X-Forwarded-Host header if it’s using it so you might not see
that anymore if you print headers in your application.
Next category of issues are related to path handling in the reverse proxy scenario.
You might get the following output when accessing /admin path:
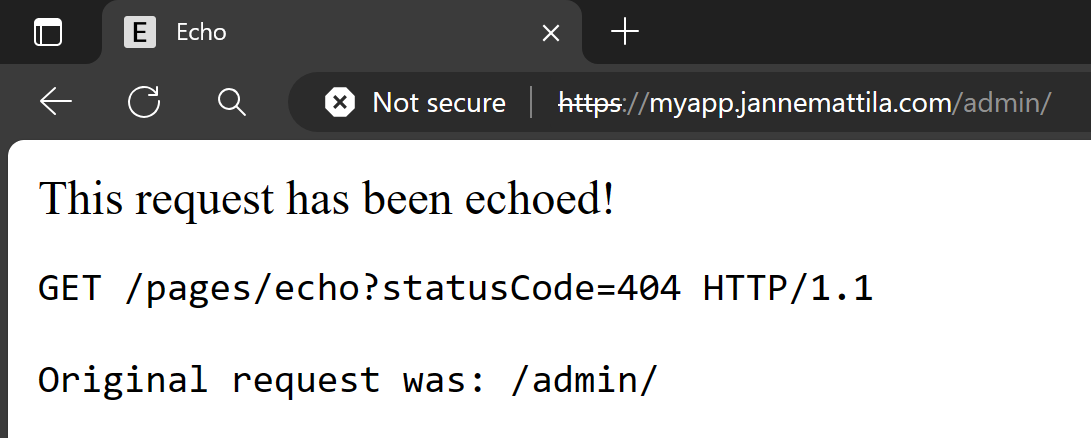
Application code actually resorted to the 404 handler since it didn’t find content for that page. This might happen if you expected following automatic mapping of the path:
https://myapp.jannemattila.com/admin -> https://adminapp.azurewebsites.net/
Options to overcome this issue:
Option 1: Merge these two apps to one
On purpose I’ve separated these two apps to show how you can handle different scenarios. But if you don’t need to have separate apps, then you don’t have to handle the path at all. Sometimes this is a valid option.
Option 2: Handle the path in your application code
This is framework specific but in ASP.NET Core you can use UsePathBase:
// Abbreviated code
public void Configure(IApplicationBuilder app, IWebHostEnvironment env)
{
    app.UsePathBase(new PathString("/admin"));
}
And for your static assets you might need to do certain tricks as well e.g., JavaScript assets with fixed paths. Here are some options to think and test:
The Document Base URL element:
<base href="/admin/">
In cshtml files you can use Url.Content to get the root path:
<script>
    var WebApp = WebApp || {};
    WebApp.Root = "@Url.Content("~/")";

    console.log(`WebApp.Root: ${WebApp.Root}`);
</script>
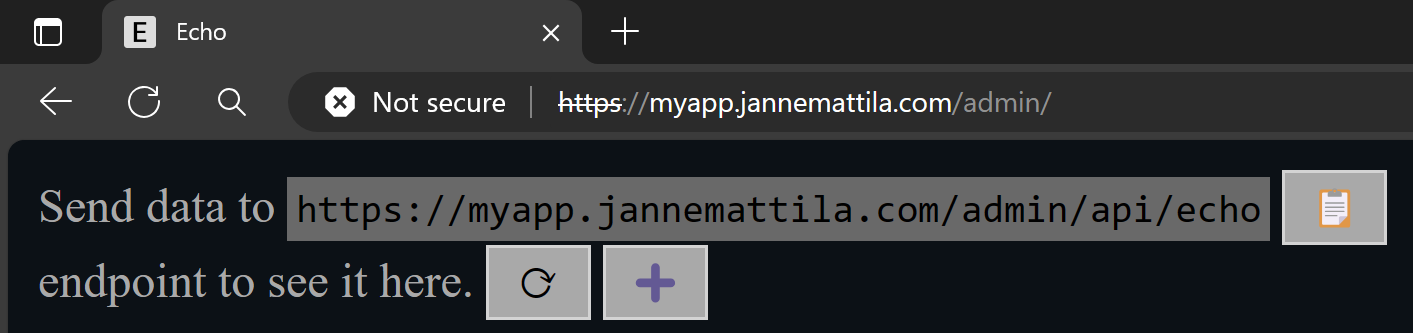
That can be used to build other paths in your application e.g., SignalR hub connection in JavaScript:
// Abbreviated code
let hubRoute = `${WebApp.Root}Echo`;
let connection = new signalR.HubConnectionBuilder()
    .withUrl(hubRoute)
    .withAutomaticReconnect()
    .withHubProtocol(protocol)
    .build();
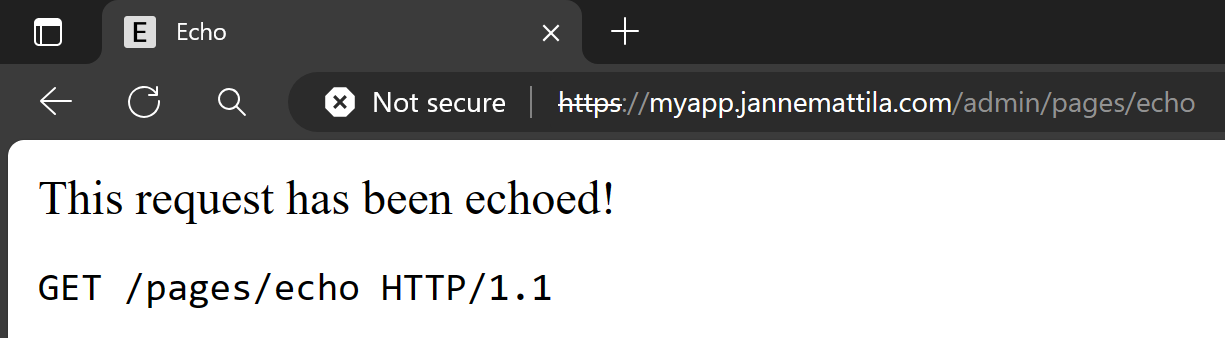
After implementing these changes, your application should work correctly from /admin path:
Option 3: Rewrite rule in Application Gateway
You can use Application Gateway to rewrite the path before it’s sent to the backend app. See more details from the documentation: Rewrite HTTP headers and URL with Application Gateway.
Here is how you can rewrite the path in the Application Gateway:
{
  ruleSequence: 200
  name: 'admin-path'
  conditions: [
    {
      variable: 'var_uri_path'
      pattern: '.*admin/(.*)'
      ignoreCase: true
    }
  ]
  actionSet: {
    urlConfiguration: {
      modifiedPath: '{var_uri_path_1}'
      reroute: false
    }
  }
}
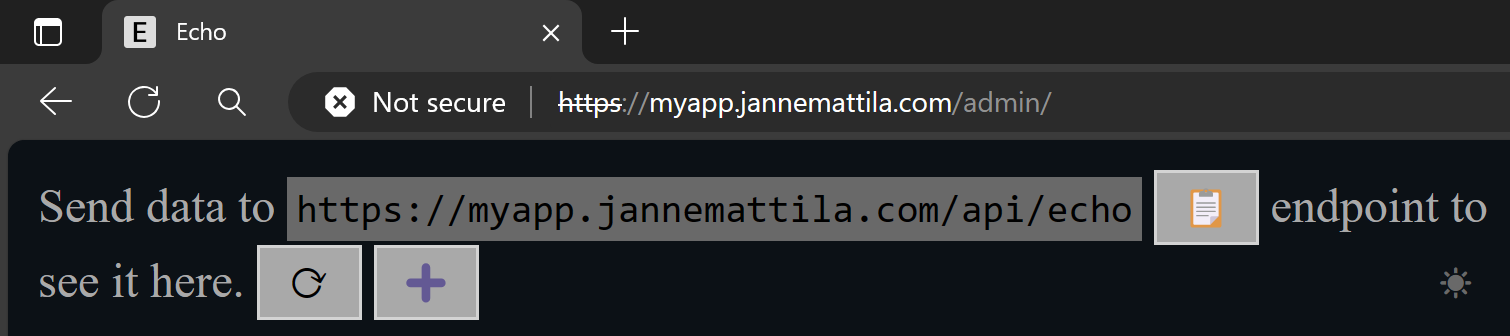
Now backend app is receiving the request without the /admin path:
But you can easily leak out the original path in the response and they might be hard to rewrite in the Application Gateway:
Option 4: Virtual applications and directories in App Service
Okay this is not really an option but technically you can use virtual applications and directories in App Service. Of course, this option is only available on Windows and if deploy your code directly to the App Service (so it is not technically possible if using Linux or containers). There is an excellent write-up about this in Stack Overflow.
So please do test these options and see which one fits your needs the best.
Conclusion
In this post, I showed how to combine App Service authentication with Application Gateway and Web Application Firewall. I tried to cover different aspects related to this scenario so you can easily adapt this to your own needs.
This was originally published in my GitHub repository:
I hope you find this useful!